1 Receiving a Purchase Order
The ePro system enables Vendors to connect and do business electronically with agencies employing it which includes responding to Bid Solicitations and receiving Purchase Orders online. To view Solicitations, submit responses, and view Purchase Orders, vendors must register in the agencies' respective system (e.g. COMMBUYS, NevadaePro, ARBuy, OregonBuys, etc).
Once the vendor is fully registered, the Vendor will be able to view and respond to Solicitations and to view Purchase Orders sent from the agency (specific to each individual agency). These actions will be accomplished in the Seller role in the system. As such, a user should navigate to the Seller role to execute the activities outlined in this guide.
Finally, in this guide, the term "Agency" is used to refer to all the various agencies utilizing an ePro product solution.
1.1 Purchase Order Notification
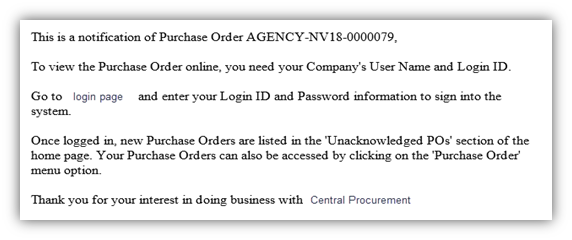
The Seller will receive an email from the system notifying the Seller of a Purchase Order. The email is sent to the Vendor’s general or Purchase Order Mailing email address (unless otherwise selected by the agency).
1.2 Homepage
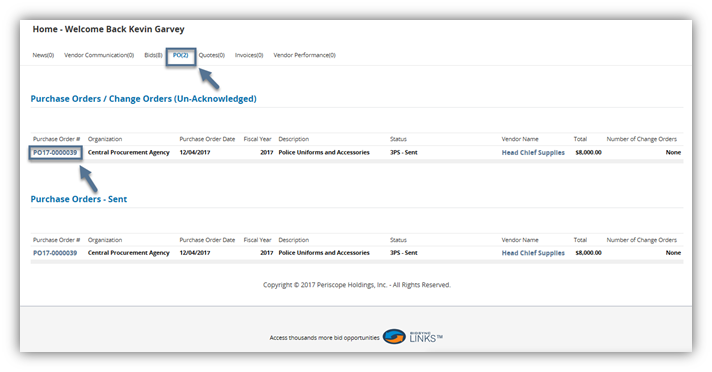
The purpose of the Homepage is to present documents the Seller may take action on (e.g., Open Solicitations, Purchase Orders) or that the Seller has created in the past (e.g., Quotes, Invoices). The homepage also presents the latest news items or updates regarding the system.
Step 1: Click PO tab
The Purchase Order tab is divided into three sections: Purchase Orders/Change Orders (Un-Acknowledged), Purchase Orders - Sent, and Subcontractor - Purchase Orders.
If the Agency has enabled Bilateral Change Orders, the Seller will have a section, Change Orders Pending my Approval to review and approve Change Orders sent by the Agency. See Section 3 for steps on approving Bilateral Change Orders.
Step 2: Click the Purchase Order number
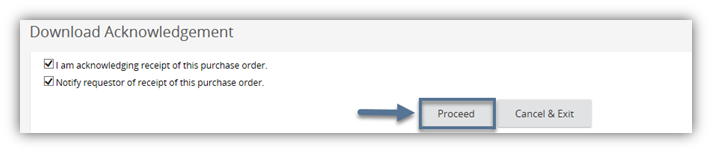
If the Seller has not acknowledged the Purchase Order, then the Seller should select both checkboxes presented to acknowledge the Purchase Order and to notify the requestor and click Proceed.
The Summary tab is initially displayed to the Seller.
1.3 Summary tab
The Summary tab provides an overview of all the information provided by the Seller on the previous tabs.
Step 1: Click the General tab
The Seller cannot take action on the Purchase Order from the Summary tab.
1.4 General tab
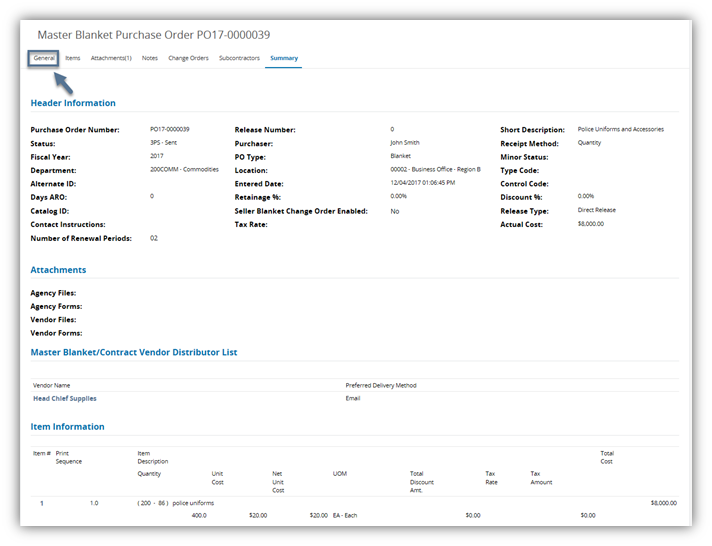
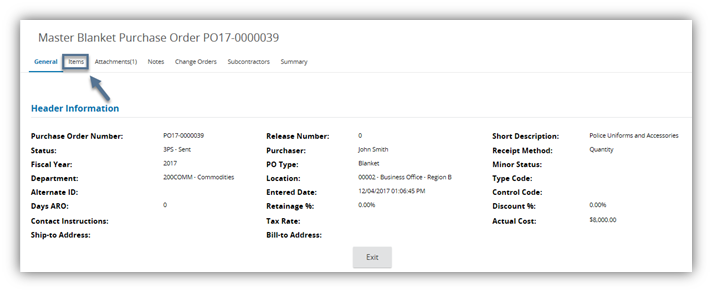
The purpose of the General tab is to display header level data for the specific document to the Seller. The Seller cannot take action on the General tab.
Step 1: Click the Items tab
1.5 Items tab
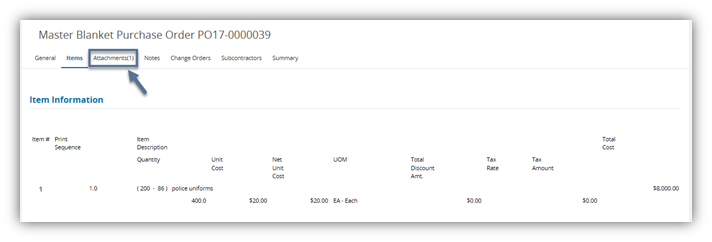
The purpose of the Items tab is to display the details of the goods or services ordered, such as the description, quantity, and price. The Seller cannot take action on the Items tab.
Step 1: Click the Attachments tab
1.6 Attachments tab/Agency subtab
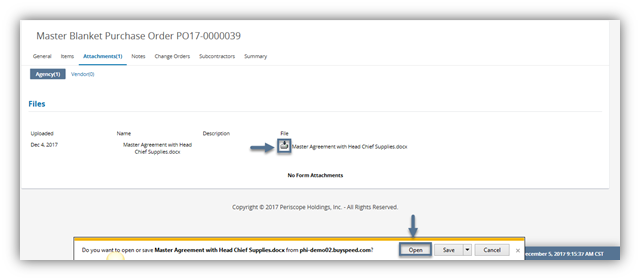
The Attachments tab/Agency subtab displays to the Seller the attachments uploaded by the Agency for the Purchase Order. The Seller is able to download the attachments from this tab.
1.6.1 Files
Files are documents that are completed outside of the system, saved, and uploaded to the system.
1.6.1.1 Download attachments
Step 1: Click the download icon next to the file name
Step 2: Open the file
1.6.2 Forms
Forms are documents that are completed electronically in the system by the Seller and saved to the document.
1.7 Attachments tab/Vendor subtab
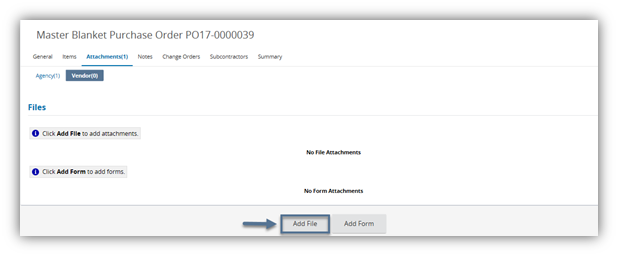
The purpose of the Attachments tab/Vendor subtab is to capture any supporting documentation regarding the Purchase Order that may be helpful to the Purchaser or Basic Purchasing user managing the Purchase Order. The Basic Purchasing user managing the Purchase Order will receive an email notification when the Seller has uploaded attachments to the Purchase Order.
1.7.1 Files
Files are documents that are completed outside of the system, saved, and uploaded to the system.
1.7.1.1 Upload Attachments
Step 1: Click Add File
Step 2: Click Browse
The Seller clicks Browse to upload a file from their computer.
Step 3: Select the file
Step 4: Complete the fields
The Seller may update the Name for the attachment and enter a description that will display to the Agency user.
Step 5: Update visibility
The Seller can make the attachment confidential so external users cannot see the attachment.
Step 5: Click Save & Exit
The Seller can click Save & Continue to remain on the page to update the visibility or edit the description. The Seller can click Cancel & Exit to exit from the page without saving.
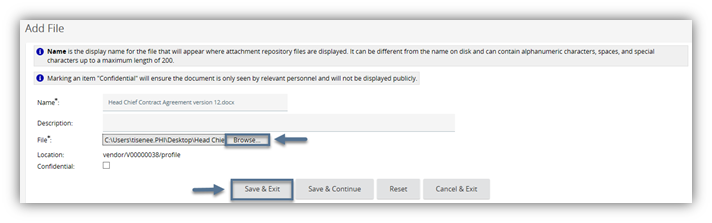
NOTE: Once the Seller clicks Save & Exit, the Seller can only edit the visibility or delete an attachment with a Change Order.
1.7.1 Forms
Forms are documents that are completed electronically in the system by the Seller and saved to the document.
1.8 Notes tab
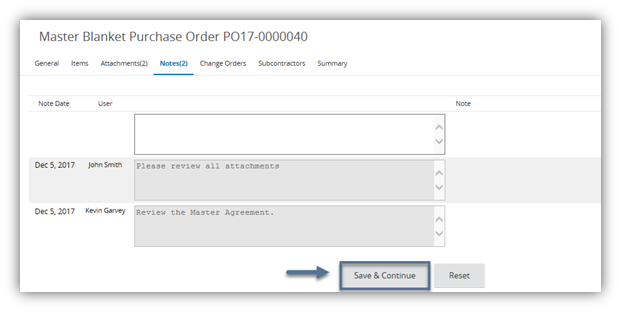
The purpose of the Notes tab is to capture notes applicable to all Items listed on the Purchase Order. Authorized Sellers on the Vendor's account can access the notes. The Purchaser or Basic Purchasing user managing the Purchase Order will receive an email notification of the Seller's notes and can view the note on the Purchase Order. If the agency creates a note for the Seller to view and read, the Seller will see the Agency's notes on this tab.
Step 1: Enter note information in the box
Step 2: Click Save & Continue
The Seller can click Reset to erase all information entered in the box, prior to clicking Save & Continue. Notes cannot be deleted.
Step 3: Click Change Orders tab
1.9 Change Orders tab
The purpose of the Change Order tab is to display to the Seller any Change Orders associated to the Purchase Order and to allow the Seller to create Change Orders. A Seller can create a Change Order on Master Blanket Purchase Orders if the agency has given the Seller user the explicit privilege to create a Change Order, and the Purchaser has allowed Seller created Change Orders for the specific Purchase Order.
See section 2 for steps to create a Change Order.
1.10 Subcontractors tab
The purpose of the Subcontractors tab is to display to the Seller the subcontractor information if applicable including the participation data.
2 Creating a Change Order for a Master Blanket Purchase Order
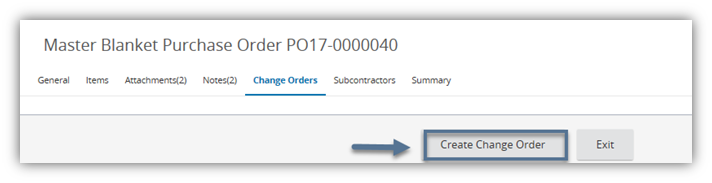
A Seller can create a Change Order on Master Blanket Purchase Orders if <client name> has given the Seller user the explicit privilege to Create a Change Order and the Purchaser has allowed Seller created Change Orders for the specific Purchase Order.
Step 1: Click Create Change Order
2.1 General tab
The Seller cannot update the General tab using the Master Blanket Change Order.
2.2 Items tab
The Seller can update the Items tab using the Master Blanket Change Order. The Seller can edit or add items in the system or the Seller can export the items into a CSV file, edit the items, and upload items into the system.
2.2.1 Edit Items in the System
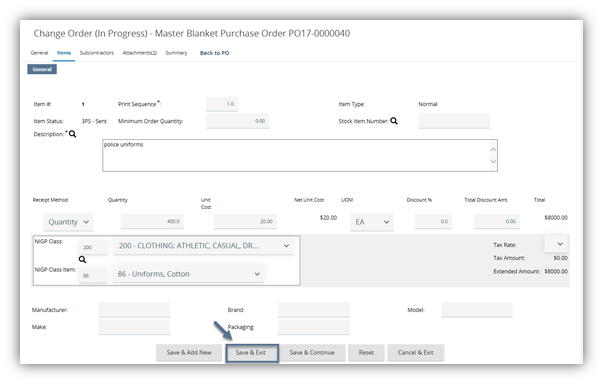
When the Seller needs to make minor edits to items, the Seller may edit items directly in the system.
Step 1: Select the Item under Item #.
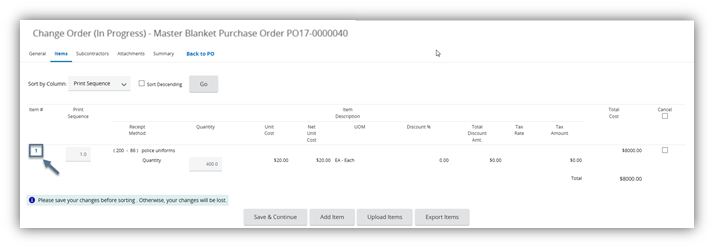
Step 2: Edit Item information
Step 3: Click Save & Exit
2.2.2 Export/Upload Items
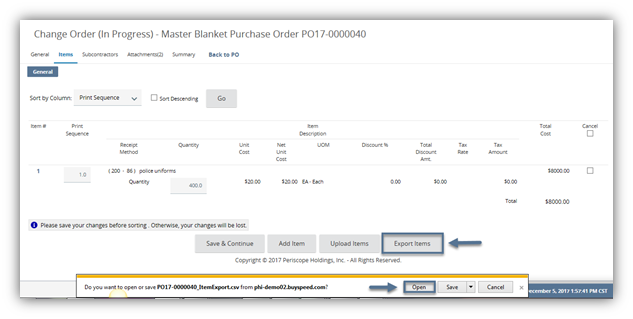
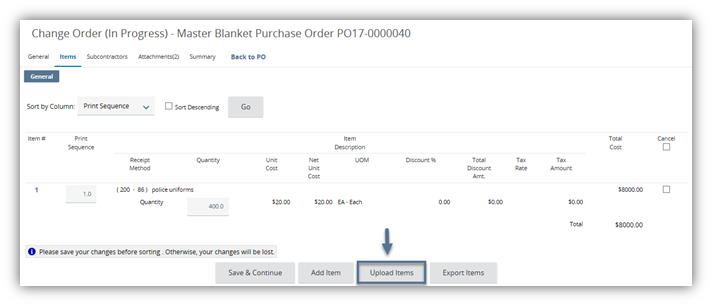
When the Seller needs to make multiple edits to items, the Seller may export the items into a CSV file, edit the items, add items and upload the changes. The Import file must adhere to a specific CSV file format. The most straightforward way to obtain a CSV file in this format is to select Export Items.
Step 1: Click Export Items
Step 2: Click Open to open the exported CSV template
Step 3: Update the template
The exported file is the template to use to add additional items to the Purchase Order or to make changes to the existing items.
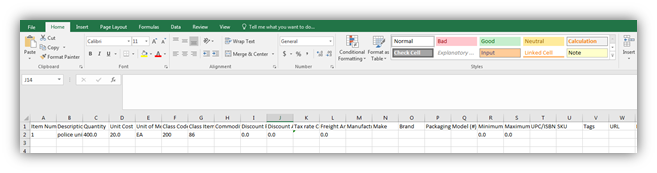
The exported file contains columns A thru AC. Refer to the table below for descriptions of each column and guidance on entering information into each column. The Field Entry column lists the required fields and other guidance or restrictions that apply to particular fields. Required fields are identified with an asterisk.
|
Excel Column |
Column Header |
Field Description |
Field Entry Guidance/Restrictions |
|
A |
Item Number* |
The number that determines the sequential order of each item in the system |
Must be sequential |
|
B |
Description* |
Description of line item |
Maximum of 4000 alphanumeric characters (avoid special characters). Recommended to use standard inventory descriptions. Description is a searchable field in the system catalog. |
|
C |
Quantity*
|
Quantity of item being requested |
Maximum of 15 integers or decimal values without commas (cannot have more than 5 decimal places). If there is an indefinite quantity available, enter “0”. |
|
D |
Unit Cost* |
Cost of each item |
Maximum of 15 integers or decimal values without commas (cannot have more than 5 decimal places). Value entered must be greater than or equal to “0”. |
|
E |
Unit of Measure*
|
A valid unit of measure in the system, associated with the listed item |
Enter in all caps and must be a valid abbreviation in the system drop-down menu |
|
F |
Class Code* |
Three digit NIGP Class Code associated with the item |
Must be valid NIGP Class Code in the system |
|
G |
Class Item Code* |
Two digit NIGP Class Item Code associated with item |
Must be valid NIGP Class Item Code in the system |
|
H |
Commodity Code |
Six digit NIGP Group Detail code. (Available if configured) |
|
|
I |
Discount Percent |
Discount % for line item |
If entered, the Discount Amount must equal (Unit Cost * Quantity * Discount Percent). Entered as a whole number, 5% discount enter as “5”. Cannot have more than 3 decimal places. |
|
J |
Discount Amount |
Total Discount dollars based on Discount % |
Required if Discount Percent entered. Cannot have more than 2 decimal places. Entered as a negative number. Discount Amount must equal (Unit Cost * Quantity * Discount Percent) |
|
K |
Tax rate Code |
Tax rate code based on client’s configuration for Tax Rate Code |
If applicable, enter a Tax Rate ID from client’s tax rate codes in the dropdown. (Maintain Tax Rates) |
|
L |
Freight Amount |
The amount of Freight applied to this item |
Maximum of 10 integers or decimal values without commas (no more than 2 decimal places). If Freight Amount is $1.50, enter as “1.5”. |
|
M |
Manufacturer |
Manufacturer of item |
Maximum of 30 alphanumeric characters. Recommended to enter if known. |
|
N |
Make |
Make of item |
Maximum of 30 alphanumeric characters. Recommended to enter if known. |
|
O |
Brand |
Brand of item |
Maximum of 30 alphanumeric characters. Recommended to enter if known. |
|
P |
Packaging |
Packaging of item |
Maximum of 30 alphanumeric characters. Recommended to enter if known. |
|
Q |
Model (#) |
Model of item |
Maximum of 30 alphanumeric characters. Recommended to enter if known. |
|
R |
Minimum Quantity |
Minimum quantity that can be ordered |
Maximum of 15 integers and decimals without commas (no more than 5 decimal places) |
|
S |
Maximum Quantity |
Maximum quantity that can be ordered |
Maximum of 15 integers and decimals without commas (no more than 5 decimal places) |
|
T |
UPC/ISBN |
UPC/ISBN number for the item |
Maximum of 30 alphanumeric characters. Recommended to enter if known. |
|
U |
SKU |
SKU for the item |
Maximum of 30 alphanumeric characters. Recommended to enter if known. |
|
V |
Tags |
Keywords that will return this item in a search |
Comma separated keywords. Maximum of 30 alphanumeric characters. Recommended to enter if known. |
|
W |
URL |
External URL that provides more info on the product |
Recommended to enter if known |
|
X |
Product Length |
Product length of the item |
Recommended to enter if known. Max of 50 integers or decimals without commas. |
|
Y |
Product Width |
Product width of the item |
Recommended to enter if known. Max of 50 integers or decimals without commas. |
|
Z |
Product Height |
Product height of the item |
Recommended to enter if known. Max of 50 integers or decimals without commas. |
|
AA |
Product Weight |
Product weight of the item |
Recommended to enter if known. Max of 50 integers or decimals without commas. |
|
AB |
Main Image |
An image of the item |
Images must be from a publicly accessible URL. Format must be .jpg, .jpeg, .bmp, or .png |
|
AC |
Main Image Text |
Description of the image |
Required if image is uploaded. Maximum of 200 alphanumeric characters. All images must have text describing them for ADA compliance |
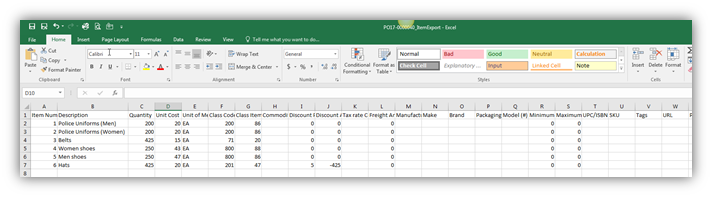
Step 4: Save file as CSV file
The Seller must follow the field entry guidance when making changes to the template.
Step 4: Click Upload Items
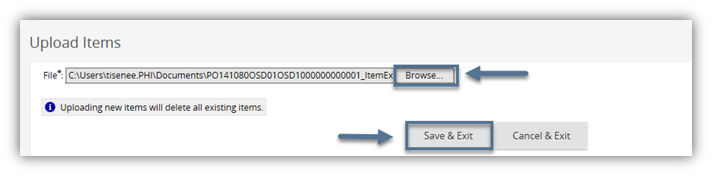
Step 5: Click Browse
The Seller will locate the saved CSV file to upload.
Step 6: Click Save & Exit
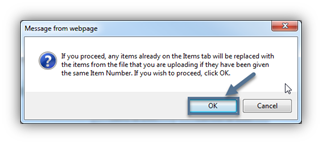
Step 7: Click Ok to Proceed to Upload Items
The Seller must click OK to proceed to upload the template. The message indicates items in the file with the same Item Number will replace any items on the Items tab. Click Cancel to return to the Items tab without uploading the file.
Step 8: Review Errors, if applicable
If errors are encountered during the upload process, they will display in the Validation Errors system message. The Seller must review the error(s) and return to the file to make the necessary corrections. The Seller must fix the errors in order to upload the CSV file. After making the corrections return to Upload Items and repeat the steps for the upload.

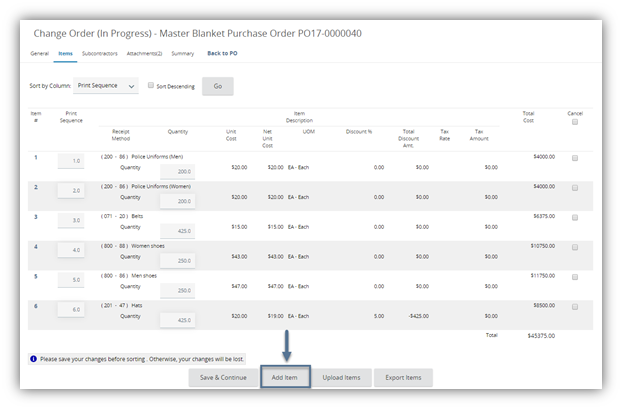
Step 9: Items tab displays uploaded CSV template information
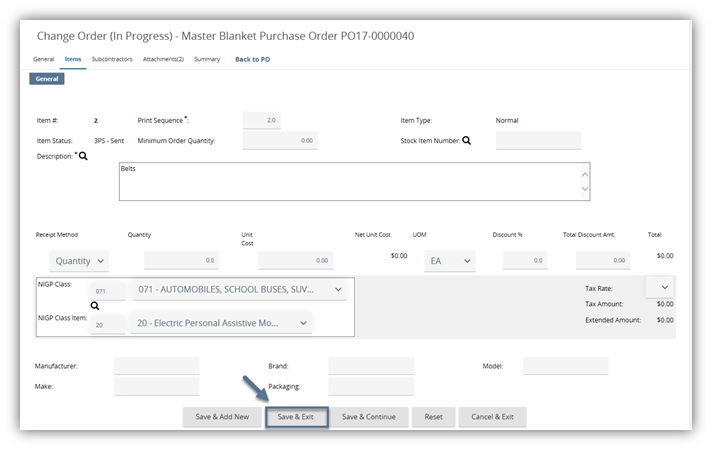
2.3.4 Add Item
The Seller is able to add Items to the Purchase Order.
Step 1: Click Add Item
Step 2: Complete Required Fields
|
Field Name |
Field Description |
Field Implication |
Recommended Usage |
|
Description |
Description of line item |
Searchable in external searches (if applicable) |
Descriptions are often structured "noun, descriptive adjectives"; for example: green beans, 8oz can, French style |
|
NIGP Class ID |
Three digit Class Code associated with the item |
Searchable in internal and external searches |
NIGP codes are used to track spend and identify strategic sourcing opportunities |
|
NIGP Class Item ID |
Two digit Class Item ID associated with item |
Searchable in internal and external searches |
Additional detail to NIGP Class ID |
|
Quantity
|
Quantity of item being requested |
Visible externally and to Vendors |
For unknown quantities, enter "1" |
Step 3: Complete Optional Fields as preferred
|
Field Name |
Field Description |
Field Implication |
Recommended Usage |
|
Unit Cost |
Estimated price of each item |
Used to calculate overall estimated cost |
n/a |
|
UOM |
Unit of Measure for item |
Visible externally and to Vendors |
n/a |
|
Discount % |
Discount % for item |
Discount % will change the Total Cost of item |
n/a |
|
Total Discount Amt. |
Total Discount dollars based on Discount % |
Calculated automatically by system based on Discount %; user can edit |
n/a |
|
Tax Rate |
Configurable dropdown |
Tax rate is included in Estimated cost if used |
n/a |
|
Manufacturer |
Manufacturer for item |
Informational, Vendor cannot edit on Quote |
Varied |
|
Brand |
Brand of item |
Informational, Vendor cannot edit on Quote |
Varied |
|
Model |
Model of item |
Informational, Vendor cannot edit on Quote |
Varied |
|
Make |
Make of item |
Informational, Vendor cannot edit on Quote |
Varied |
|
Packaging |
Packaging of item |
Informational, Vendor cannot edit on Quote |
Varied |
Step 4: Click Save & Exit
The Seller can click Save & Continue to stay on the page or can click Save & Add New to save the current item information and add a new item. The Seller can click Reset to erase the entered information or click Cancel to exit out of the page to return to the Items tab.
2.3 Subcontractors
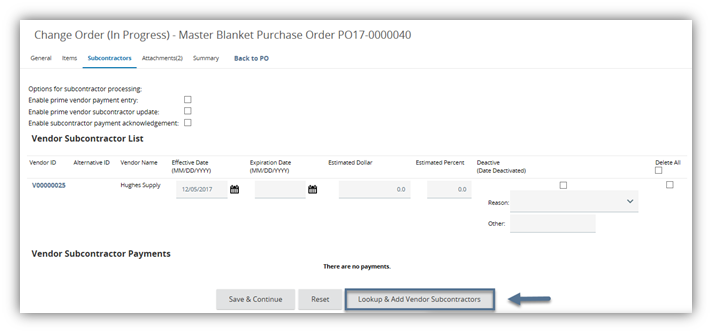
The Seller can update the Subcontractors tab using the Master Blanket Change Order. New subcontractors may be added and existing subcontractors may be deactivated.
2.3.1 Add Subcontractor
Step 1: Click Lookup & Add Vendor Subcontractors
A new window will open for the Seller to search for subcontractors. The Seller may enter any of the search criteria and click on Find It.
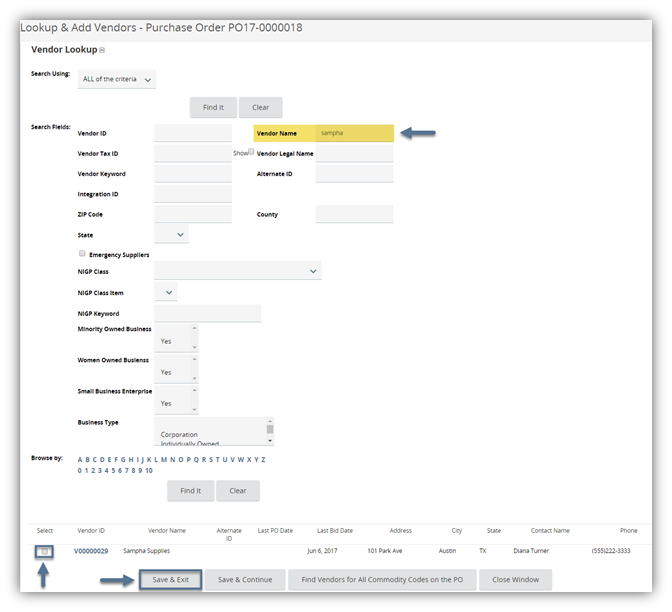
Step 2: Enter search criteria and click Find It
To return all Vendors, leave search criteria blank before clicking Find It.
Step 3: Select the Vendor and click Save & Exit
The Seller can click Save & Continue to continue to add subcontractors or click Save & Next Page to save the selected Vendor(s) and view the results on other pages. The Seller can click Find Vendors for All Commodity Codes on the PO to return all Vendors who registered for the NIGP codes listed on the Items on the Purchase Order. The Seller can click Close Window to return to the previous window.
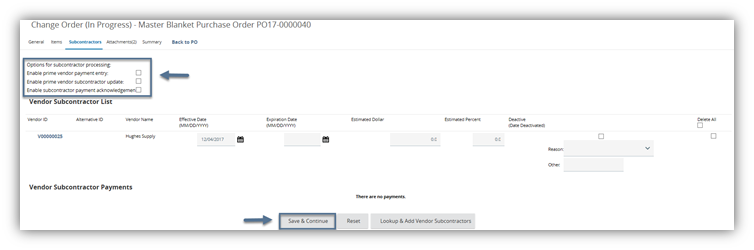
Step 4: Set subcontractor requirements
The subcontractor requirements determine how the users will manage the subcontractor on the MBPO through the system. These users include both Purchasers and prime Vendor and subcontractor personnel.
|
Field Name |
Field Description |
Field Implication |
Recommended Usage |
|
Enable prime vendor payment entry |
Allows the prime Vendor to record payments made to the subcontractors |
Documents payments made from prime Vendor to subcontractors |
Recommended |
|
Enable prime vendor payment entry |
Allows the subcontractor to see when the vendor receives payment from the agency |
Subcontractor can see payments |
Varies |
|
Enable prime vendor subcontractor update |
Allows the prime Vendor to update the subcontractor on the MBPO |
Vendor can update subcontractors |
Varies |
|
Enable subcontractor payment acknowledgement |
Allows the subcontractor to acknowledge payment from prime Vendor |
Documents subcontractor's confirmation of payment |
Recommended |
|
Effective Date |
The start date of the subcontractor |
|
Varies |
|
Expiration Date |
The date the contract between the prime Vendor & subcontractor ends |
Informational |
N/A |
|
Estimated Dollar
|
The estimated dollar amount the prime Vendor will pay the subcontractor |
Informational |
N/A |
|
Estimated Percent |
The percentage of the contract the prime will pay the subcontractor |
Informational |
N/A |
Step 5: Click Save & Continue
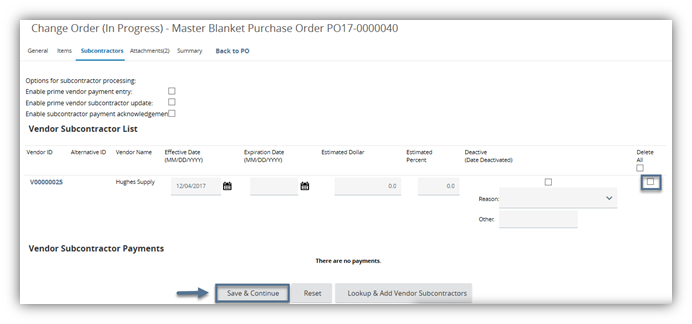
2.3.2 Delete a Subcontractor
Step 1: Select Delete
Select Delete All to remove all subcontractors from the Purchase Order.
Step 2: Click Save & Continue
Once the Seller clicks Save & Continue, the system will delete the selected subcontractor from the document.
2.4 Attachments tab/Agency subtab
The Seller cannot update the Attachments tab/Agency subtab using the Master Blanket Change Order.
2.5 Attachments tab/Vendor subtab
The Seller can update the Attachment tab/Vendor subtab using the Master Blanket Change Order. New attachments may be added, and existing attachments may be modified or deleted.
2.4.1 Add Attachments
See Section 1 for steps for adding attachments.
2.5.2 Modify Attachments
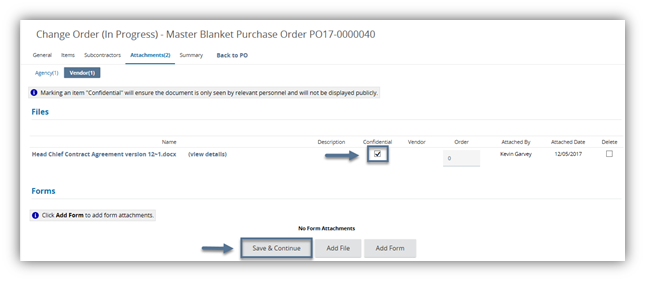
The Seller can update the order and the visibility of the attachments.
Step 1: Update visibility and order
The Seller can change the visibility of the attachment and make attachments confidential or visible to external users. The Seller can also change the order of the attachments.
Step 2: Click Save & Continue
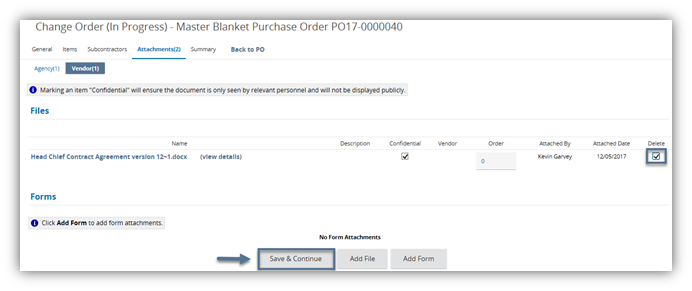
2.5.3 Delete Attachments
Step 1: Select the attachment under Delete
Step 2: Click Save & Continue
2.6 Summary tab
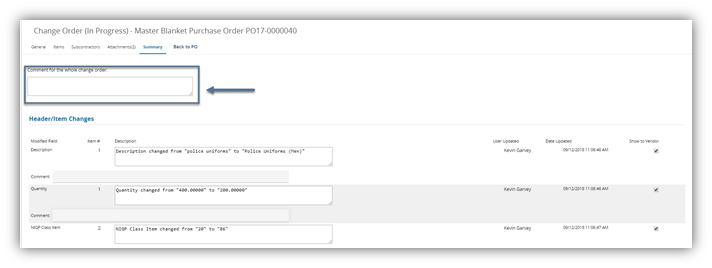
The Summary tab of the Master Blanket Change Order can be updated by the Seller. The Seller can submit the Change Order for approval or delete the Change Order.
Step 1: Complete the Comments for the whole Change Order (if desired)
The system automatically inputs changes in the Header/Item Changes section.
Step 2: Review the changes
Step 4: Click Save & Continue
Step 5: Submit for Approval
Once the Seller has submitted the Change Order for approval, the Basic Purchasing user will need to review the Change Order before approving or disapproving after the document goes through configured approval paths.
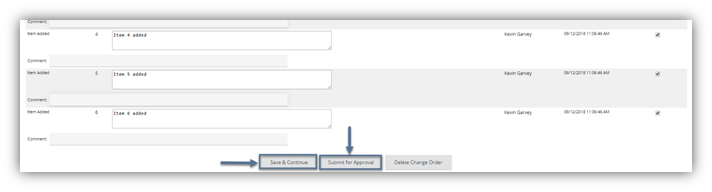
Once the Change Order is approved by the Basic Purchasing user, the Basic Purchasing user must also apply the Change Order. The Seller can only delete the Change Order. The Seller can click Delete to delete the Change Order.
2.6.1 Delete Change Order
If the Seller wishes to cancel all changes made to the Change Order, the Changer Order must be deleted.
Step 1: Click Delete Change Order
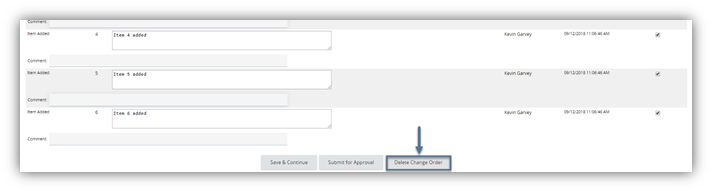
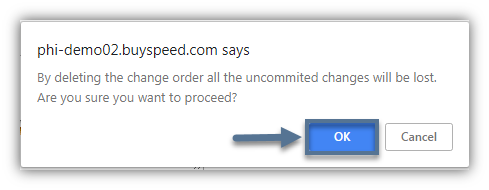
Step 2: Click Ok to the prompt to delete all changes
The Seller can click Cancel to return to the Change Order Summary tab without deleting the Change Order.
2.6.2 Disapproved Change Order
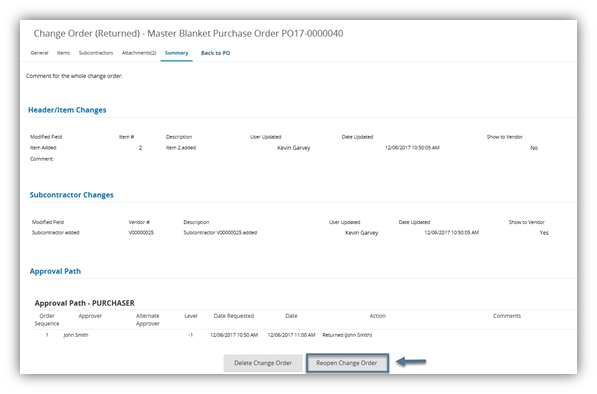
If the Basic Purchasing user has disapproved the Change Order, the Seller can reopen the Change Order and follow the steps above in creating a Change Order.
Step 1: Click Reopen Change Order to edit Change Order
Step 2: Review and edit tabs as needed
See the beginning of this section for steps on creating a Change Order.
2.6.3 Approved Change Order
If the Basic Purchasing user has approved the Change Order, the Seller can review the comments from the Basic Purchasing and create additional Change Orders if needed.
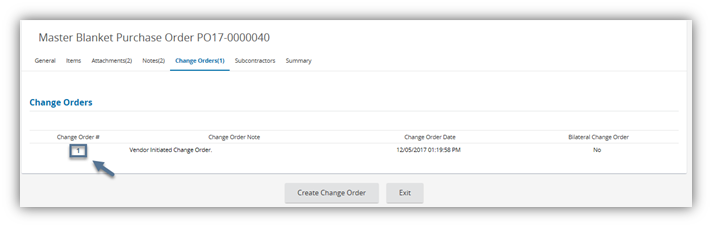
Step 1: Click Change Orders tab
Step 2: Click on Change Order #
The Seller can click Create Change Order to create additional Change Orders.
3 Approving Bilateral Change Orders
If the Agency has enabled Bilateral Change Orders, then the Seller must approve Change Orders created by the Basic Purchasing user managing the Purchase Order.
3.1 Homepage
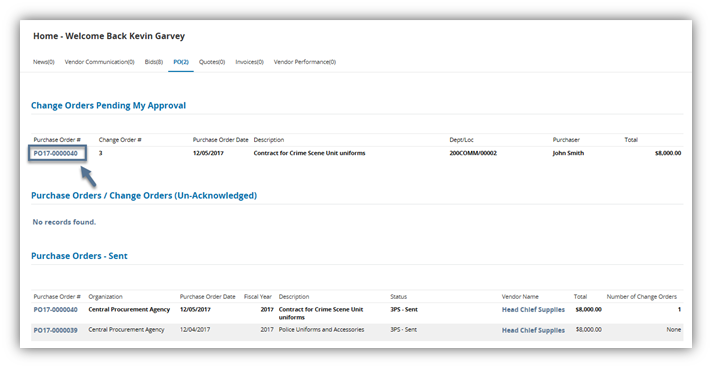
If the Seller has Change Orders to review and approve, the Change Orders will display in the Change Order Pending My Approval section on the Purchase Order tab.
Step 1: Click the Purchase Order #
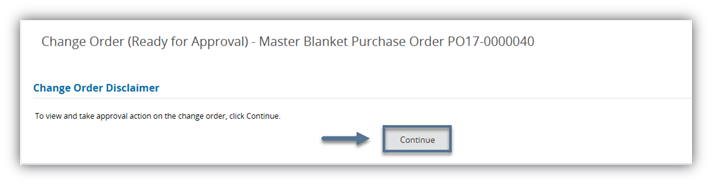
Step 2: Click Continue
The Seller will need to click Continue on the Change Order Disclaimer page in order to take action on the Change Order.
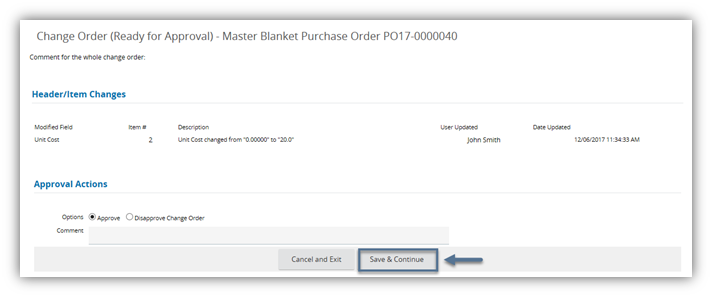
Step 3: Review changes
Step 4: Select Approve
The Seller can select to disapprove the Change Order.
Step 5: Click Save & Continue
The Seller can click Cancel & Exit to exit out of the page.
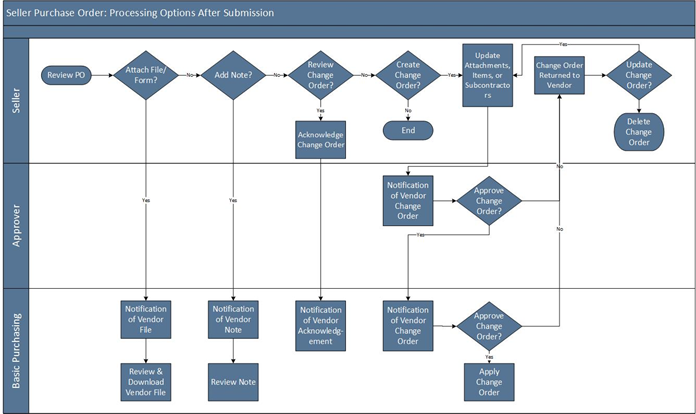
4 Document Processing
The purpose of the document processing diagram is to outline the different paths the document may take through the system after the user submits the document for approval.
0 Comments