Registering a Vendor
The State of Oregon has implemented a new eProcurement system. This new system enables Vendors to connect and do business electronically with the State of Oregon including responding to solicitations and receiving purchase orders online. To view solicitations and submit responses, Vendors must register in OregonBuys.
The purpose of Vendor registration is for the Vendor to provide necessary information to the State of Oregon as a basis to do business with the State of Oregon (referred to subsequently in this guide as "Agency"). As the Vendor representative completes the company's registration, several tabs allow for optional information to be provided (such as Vendor certifications and remit addresses). If the Vendor representative does not have this information on hand during the initial registration process, it may be added later following the completion and acceptance of the initial registration. The Vendor representative is responsible for maintaining the company's account. Following the initial registration process, the Vendor will maintain most if not all of their information online through their newly created account that is established through the registration process.
While you can explain this to calling vendors, also open the attached document "Seller Admin User Manual" for instructions and guides for registration (as well as other Seller Admin capabilities).
Login Page
The purpose of the login page is to provide a publicly accessible point of entry into OregonBuys for the State of Oregon users and Vendors. Vendors may register from the login page, either from scratch or use their S2G credentials if the Vendor has an existing S2G account.
Register with S2G Credentials
Step 1: Go to OregonBuys.gov
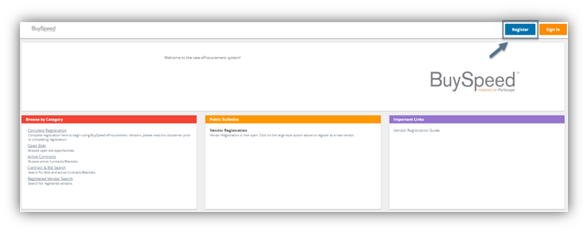
Step 2: Click Register
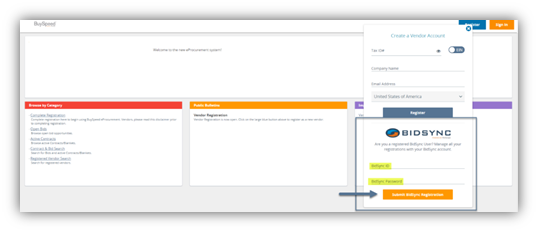
Step 3: Enter the S2G ID and Password and Click Submit S2G Registration
Much of the Vendor's information outlined below will be pulled from the S2Gdatabase into the new registration in OregonBuys.
Register from scratch
Step 1: Go to OregonBuys.gov
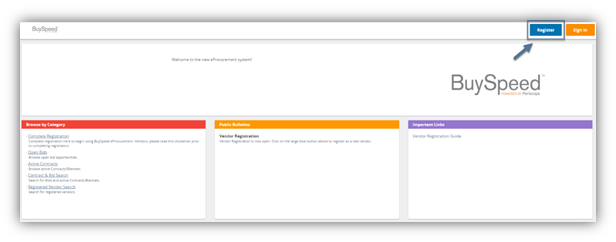
Step 2: Click Register
Step 3: Enter Baseline Company Data and Click Register
Specifically, enter Tax ID, Company Name, and Email Address.
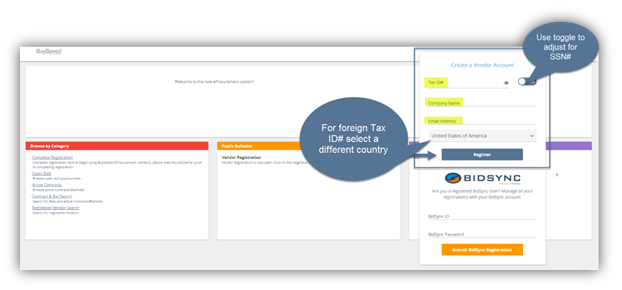
If the Vendor does not have a U.S.-issued Tax ID, the Vendor may change the country by clicking on drop down menu adjacent to the United States of America.
The slide feature next to Tax ID allows the Vendor to indicate that the Tax ID is a Social Security number.
The Vendor receives an initial registration email, containing the Vendor's assigned number. If the Vendor does not complete registration, then the Vendor number is needed to complete the registration at a later date. Use the Complete Registration link on the Homepage to enter the Vendor number and complete the registration.
Click the link in the email to setup the account access and password. Passwords must be between 10 and 50 characters, and contain at least one letter, one number, and one special character ( !"#$%&()*+,./:;<=>?@\[\]^_{|}~]+ ).
Then the application takes you through the full account set-up through each individual tab.
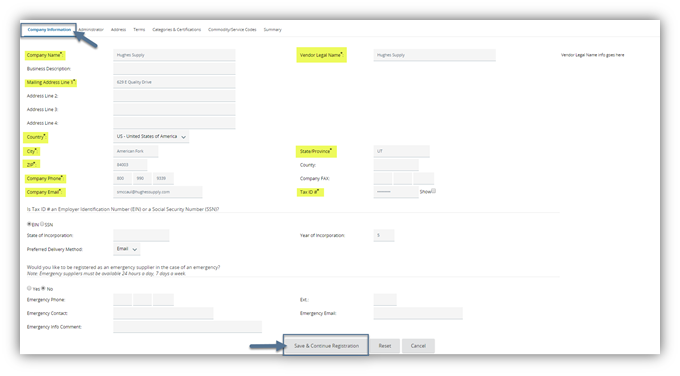
Company Information tab
The purpose of the Company Information tab is to capture baseline information on the Vendor such as their mailing address.
Step 1: Complete Required Fields
The Company Email address is used to notify Vendors of opportunities (Bids and other solicitations). Some Vendors develop an email re-direct/distribution protocol to distribute such notifications to their salesforce.
Step 2: Complete Optional Fields as preferred
Step 3: Click Save & Continue Registration
Administrator tab
The purpose of the Administrator tab is to capture data on the Vendor's key administrative user. Upon completion of registration, this user will have control of the Vendor's account including the ability to add additional users, edit existing data, and add profile attachments and forms.
Step 1: Complete Required Fields
Step 2: Complete Optional Fields as preferred
If registration was initiated with S2G credentials, then the S2G fields on this page will not display. The new ePro account will be linked to the user's existing S2G account.
If the registration was initiated from scratch, the Vendor should leave the S2G username and password fields blank. A new S2G account is established for the Vendor based on the information provided during the registration process in OregonBuys.
If the Vendor has a S2G account (but did not initiate registration with S2G credentials), the Vendor should enter their S2G Username and Password. Once registration is complete, the user's new ePro account will be linked to their S2G account.
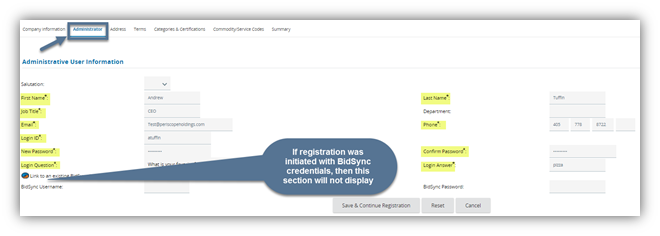
Step 3: Click Save & Continue Registration
Address tab
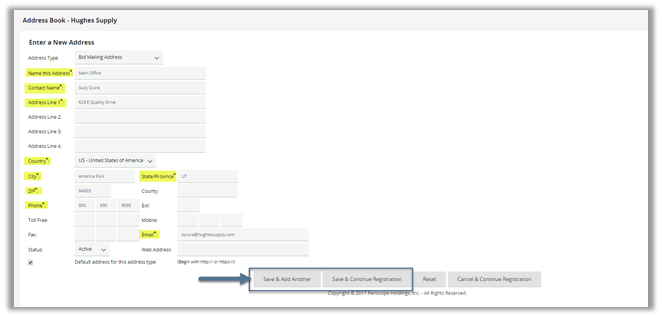
The purpose of the Address tab is to capture the Vendor's addresses for notification of solicitation opportunities, purchasing, and payment uses. The initial data the Vendor input on the Company Information tab will be used to create the Vendor's General Mailing Address.
Step 1: Click Add Another Address
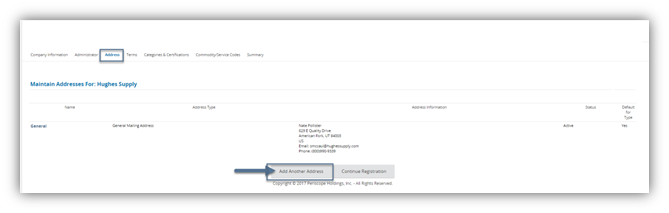
Step 2: Select Address Type from the Dropdown Menu
The Address Type designates where notification and payments are delivered. If no other addresses are added, then all notifications and payments go to the general mailing address.
|
Address Type |
Field Description |
Field Implication |
Common Usage |
|
Bid Mailing Address |
Physical and email address for Bid notifications |
Solicitation opportunities sent to default Bid Mailing email address |
Group or shared email frequently used |
|
PO Mailing Address |
Physical and email address for PO notifications |
PO notifications sent to default PO Mailing email address |
Group or shared email frequently used |
|
Remit Address |
Physical and email address for payments (some may be EFT-enabled) This address is imported from the State’s financial system, do not create. |
Payments sent to Remit Address or via EFT |
Group or shared email frequently used |
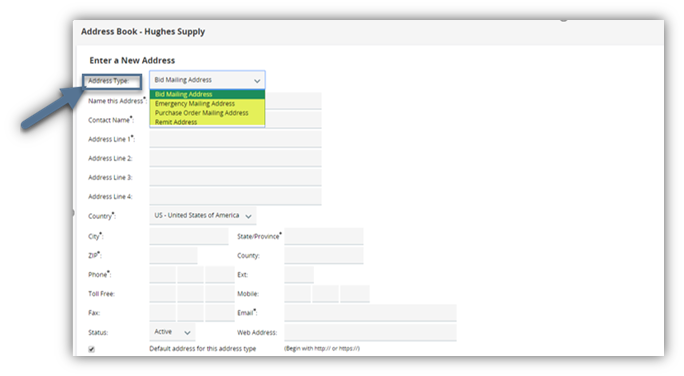
Step 3: Complete Required Fields
Step 4: Complete Optional Fields as preferred
Step 5: Click Save & Continue Registration or Save & Add Another
Terms tab
The purpose of the Terms tab is to identify preferred Vendor terms. The terms may be overridden by the procurement group.
Step 1: Click the dropdown menu to select a term
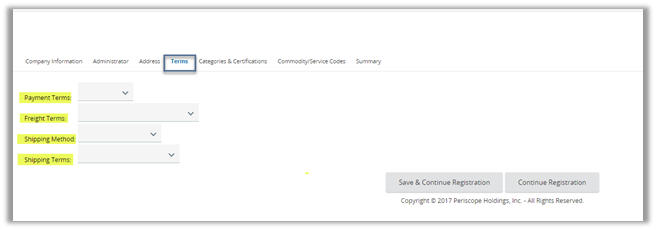
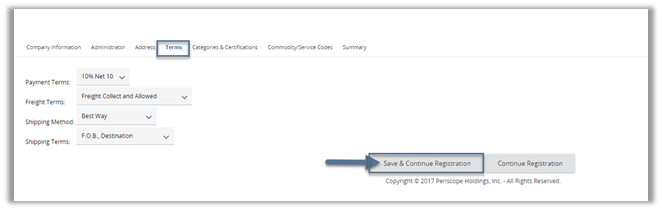
Step 2: Continue to select Terms as preferred
Step 3: Click Save & Continue Registration
Categories & Certifications tab
The purpose of the Categories & Certifications tab is to capture demographic information and related certifications that are not otherwise included in the Company Information tab.
Step 1: Click the appropriate values for each Vendor category, as applicable
The State of Oregon requires an agreement to the Terms of Use. All other Vendor categories (Disadvantage Business Enterprise, Service Disabled Veteran Business Enterprise, etc.) are configured in COBID (Certification Office for Business Inclusion and Diversity). To apply for certification for one of these categories, go to https://www.oregon4biz.com/How-We-Can-Help/COBID/. If the certification process is already completed, no further action is required. Based on the registered TaxID (with OregonBuys and COBID), the systems will sync on a daily basis. After registering, check back the next day to verify that the certifications have been appropriately added to the account.
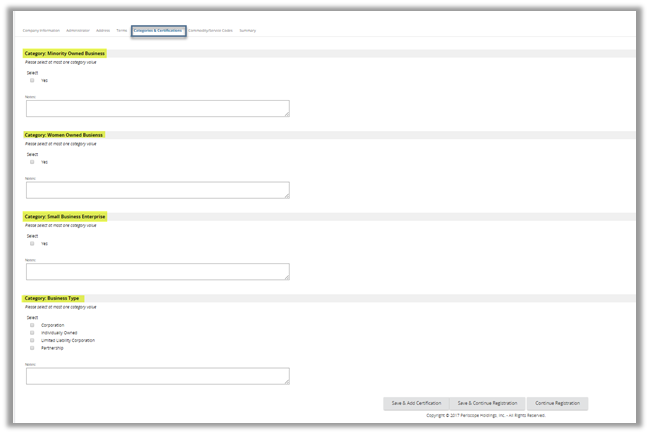
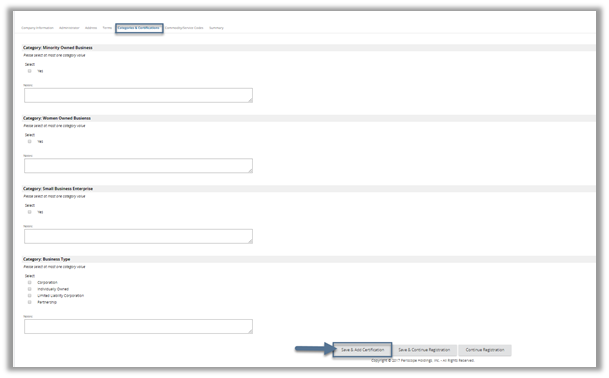
Step 2: Click Save & Add Certification
Vendor categories may have associated certifications. For example, if the Vendor identified as a small business, then the Vendor may provide the certification information at this time.
Any Vendor category that permits entry of certification data will display an Add Certification link beside the value.
Step 3: Click Add Certification, as applicable
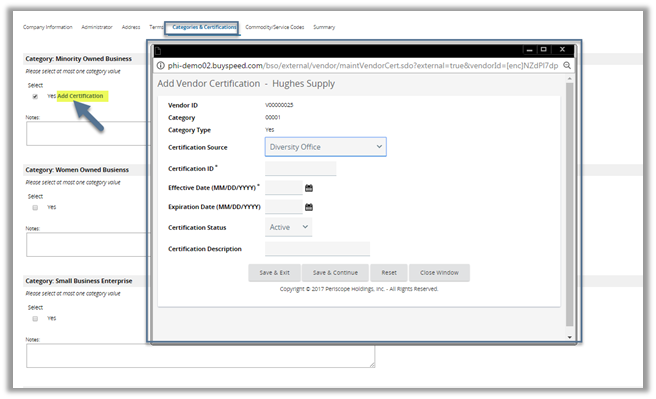
A new pop-up window for data entry will now appear to the Vendor.
Step 4: Enter Certification data, as appropriate
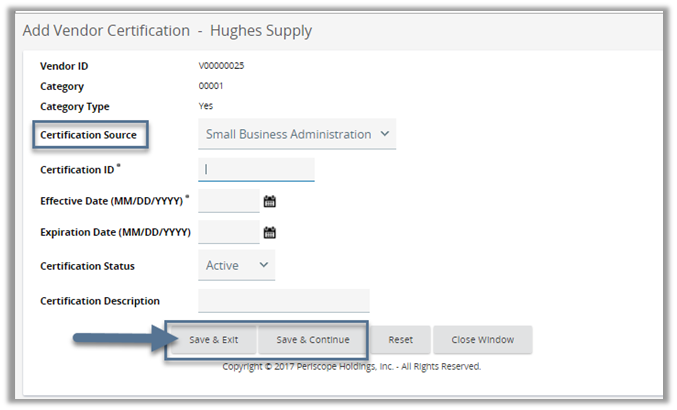
The Vendor should input all the appropriate data associated with a certification including the selection of the certification source from the dropdown menu.
Step 5: Click Save & Exit
The Vendor may click Save & Continue to continue updating the certification information. Save & Exit will return the Vendor to the registration.
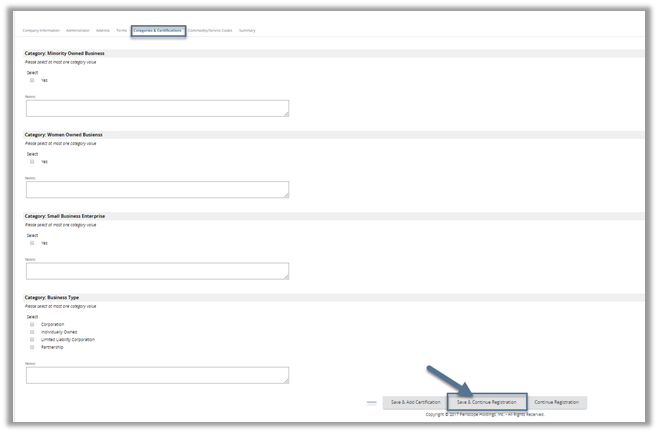
Step 6: Click Save & Continue Registration
Commodity/Service Codes tab
The purpose of the Commodity/Services Codes tab is to capture the commodity codes for which the Vendor would like to receive electronic notification of solicitation opportunities. The commodity codes identify the products and services the Vendor provides. Depending on the Vendor's familiarity with the NIGP code, the Vendor may choose from one of three ways to add NIGP codes.
Locating NIGP Codes using Dropdown
For the Vendor most familiar with the NIGP code, the system allows the Vendor to select specific NIGP class and NIGP class item codes. First, the Vendor selects the 3-digit NIGP class code, which populates the second dropdown with 2-digit NIGP class item codes.
Step 1: Select NIGP Class from Dropdown Menu
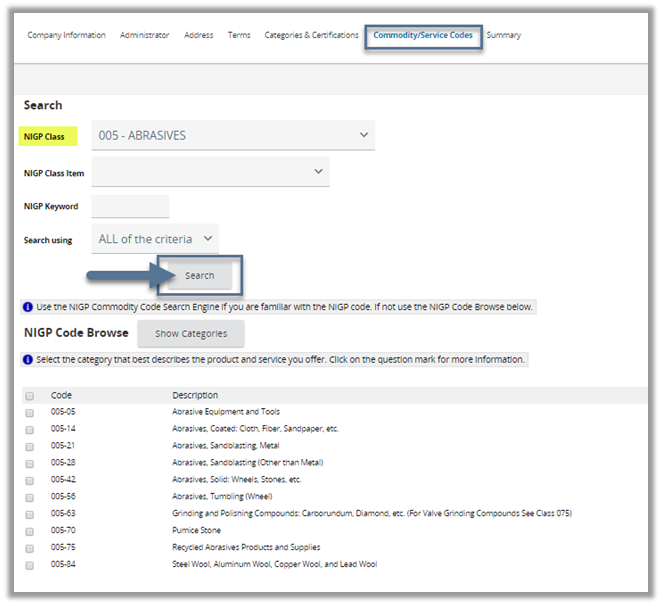
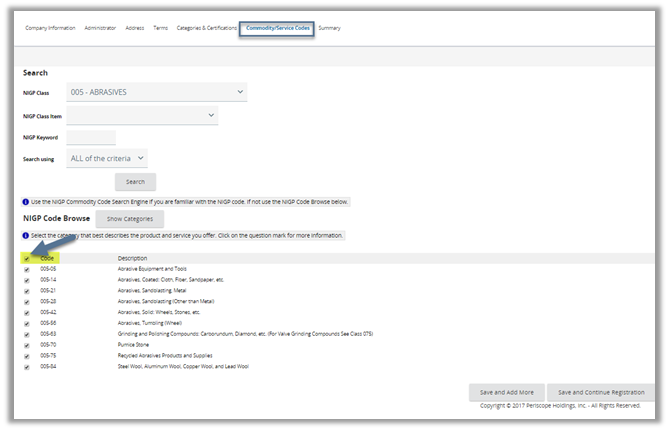
Step 2: Select Class Items by Clicking Appropriate Checkboxes
The checkbox next to "Code" allows the Vendor to select all class items with a single click.
A good practice for many Vendors is to select all NIGP class items within a class. This practice will allow the Vendor to maximize notifications of future solicitation opportunities.
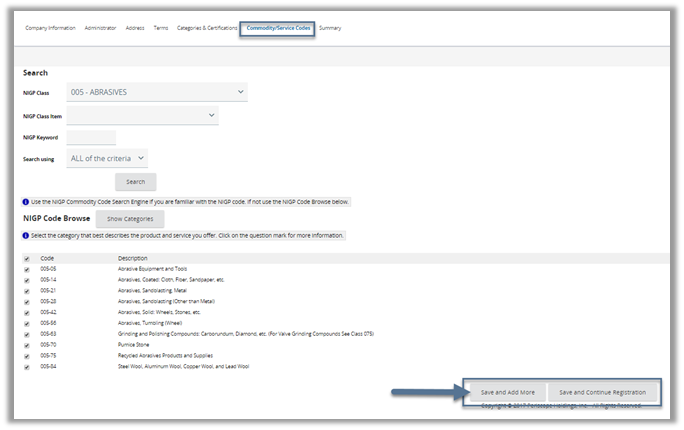
Step 3: Click Save and Continue Registration
To add commodity codes in one class, click Save and Continue Registration. To add more commodity codes, click Save and Add More. If the Save and Add More option is clicked, the Vendor will be returned to the main commodity code search screen.
Locating NIGP codes using NIGP Code Browse by Category
If the Vendor is less familiar with the NIGP code, another option is the NIGP Code Browse.
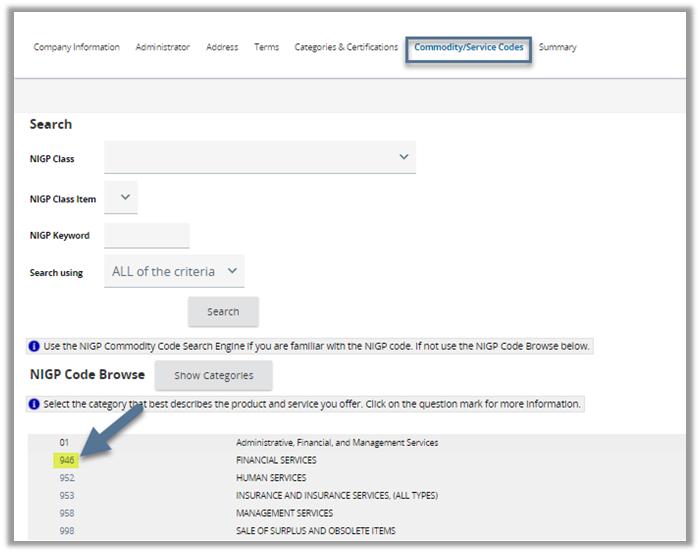
Step 1: Scroll Down to NIGP Code Browse
Step 2: Review Categories and Click the Category Number
The 2-digit categories are based on the descriptions of goods and services. Once the category number is clicked, all the NIGP classes under the category display.
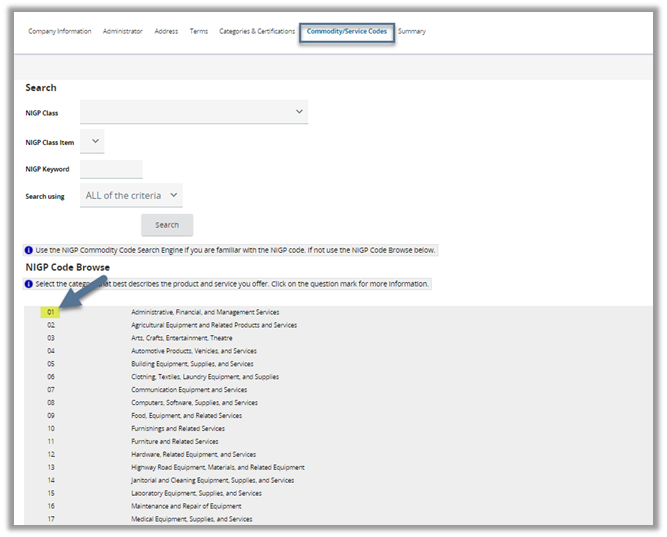
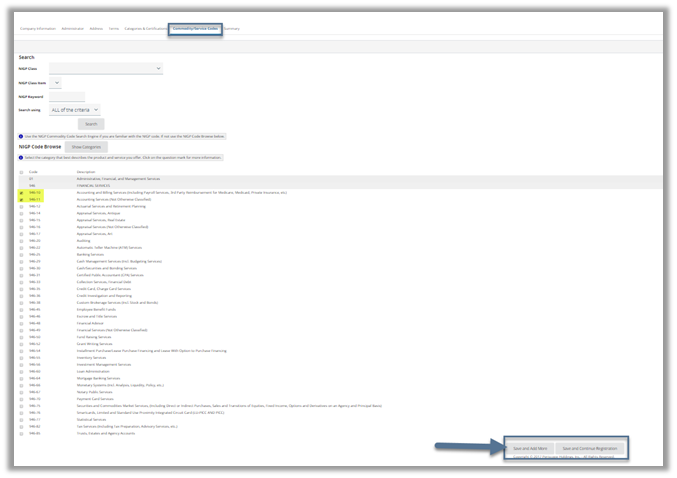
Step 3: Click the NIGP Class Number (3 digits)
Step 4: Select Class Items by Clicking Appropriate Checkboxes
Step 5: Click Save and Add More or Save and Continue Registration
Locating NIGP codes using Keyword Search
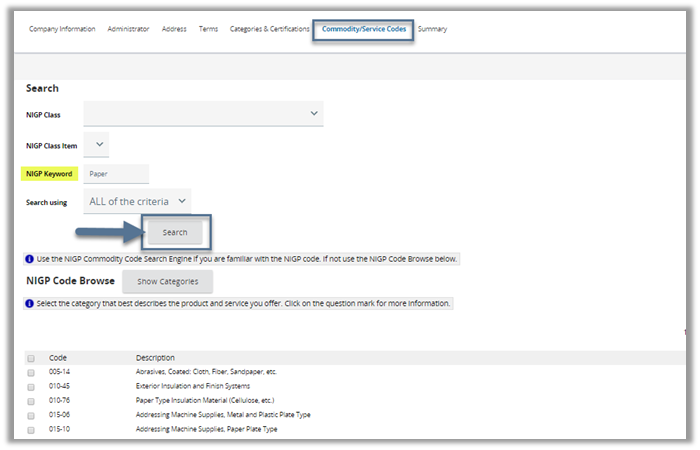
The final option to add commodity codes to the Vendor profile is the NIGP Keyword Search. While this method may be effective when searching for discrete terms (e.g., bandage), the search function may return a large number of NIGP class items. The Vendor should use this search function in combination with the NIGP Code Browse function to find appropriate class items in an efficient manner.
Step 1: Enter Keyword(s)
Step 2: Click Search
Step 3: Select Class Items by Clicking Appropriate Checkboxes
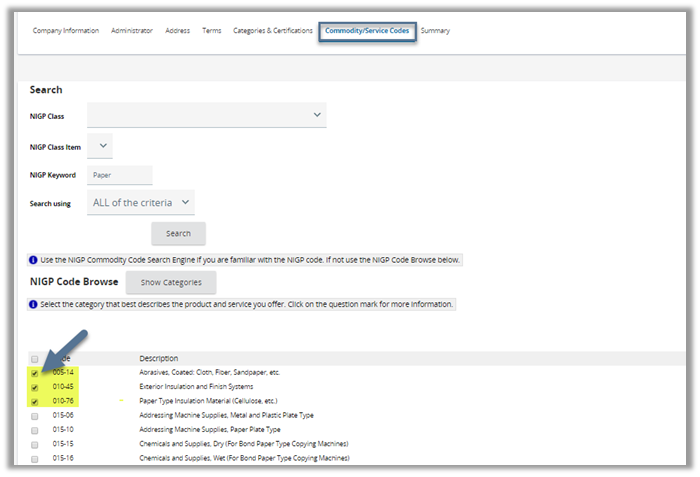
Step 4: Click Save and Add More or Save and Continue Registration
Summary tab
The Summary tab provides an overview of the information provided by the Vendor on the previous tabs. The Vendor should review the information before submitting the registration.
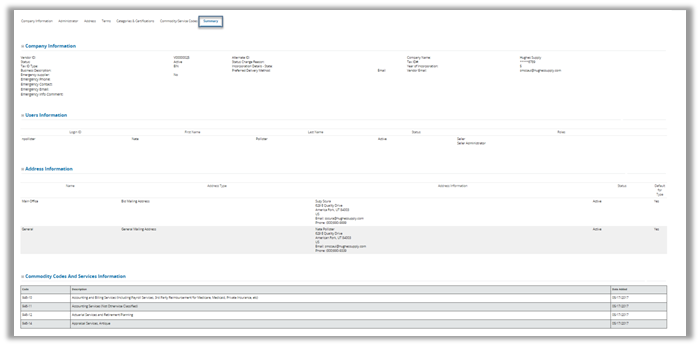
The Vendor may return to any previous tab to modify information simply by clicking on the specific tab.
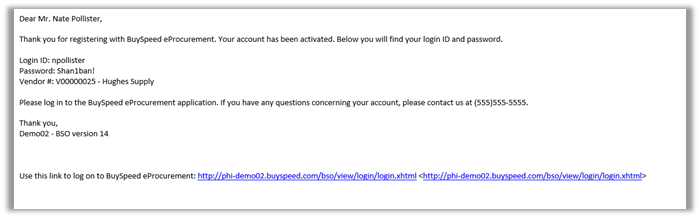
Once the Vendor is satisfied with all the information on the registration, click the Complete Registration button. A thank you for registering confirmation message is displayed. The Vendor will receive a confirmation email message from OregonBuys that their account has been activated.
A temporary password will be emailed so the Vendor may then log in to OregonBuys to add or update any information.
0 Comments